So it's 4:39am and I am sitting in my living room waiting for the clock to read 5:00 so I can leave for my 5:13 train.
My family is upstairs, still sleeping. I can hear the sounds of my 4-year-old snoring slightly. But, alas, my day has begun.
I can say with no hesitation that this is the hardest job I have ever had. In addition to being physically draining from being such a long day, it is also mentally taxing. At the end of the school day yesterday, I was standing with the principal in the main corrider of the school discussing something. He had to interrupt me to attempt to catch a student from our program (not in my class, but in one of the other 3 classes in the alternative middle school program). I heard him very politely request a word with the student. The student's response? "Nah, F*&k you, man," and he kept walking.
I know many teachers would have been shocked for a student to say that to a principal, but not us. It's par for the course. Growing a thick skin is a MUST for this job.
***
One of my challenges in teaching in this program is finding a way for the students to connect with the material. The small group I have is very inquisitive. They want to know about the world.
In an effort to teach about descriptive writing and creating mental pictures for the reader, I needed to make them understand about the human condition. Because in no way were they going to be able to utilize language to convey depth of meaning without fully comprehending human emotion. I showed them about 60 minutes worth of the Boxing Day 2004 Tsunami footage. It was raw, unedited, and horrifying. They were riveted.
They asked insightful questions and wanted to know and understand more. I then launched into a lesson about earthquakes, tectonic plates and how tsunamis are formed. They got to see the scientific side and the human side. They began to understand a little more about human loss and I could see the compassion on their faces -- the compassion they so desperately try to mask by being "tough."
The writing that poured out of them following these videos was amazing. Real writers are starting to emerge -- if I can only get them to utilize punctuation. I am excited to see what more writing they have in store for me this year.
Here is the link to the Tsunami footage I showed. It is an 8 part YouTube documentary, and about 80 minutes long total. I didn't show the whole thing, but enough for the students to truly understand what happened.
http://www.youtube.com/watch?v=Y9HIXZmmSus

Wednesday, September 19, 2012
Friday, September 14, 2012
Positive Reinforcement in the Inner City
To any teachers who decide to take a job teaching in the
inner city, I have one piece of advice for you: take everything you have been
taught about behavior management and throw it right into the trash.
Teaching in an alternative program has taught me that there
are kids in the world who just need more. More of everything. I have 3
different students born in 3 different countries, 3 different nationalities,
and 3 different styles of parenting.
Below is a rough replica of the chart
our program uses, designed by the whole team, to combat behaviors:
My daily personal goal: “To control my temper” (example)
Respect Others?
|
Respect Self?
|
Respect School?
|
Did you work toward meeting your daily goal? Y/N
|
How were you feeling?
|
Total
|
|
Period 1
|
* * *
|
* * *
|
* * *
|
9
|
||
Period 2
|
||||||
Period 3
|
||||||
LUNCH
|
||||||
Period 4
|
||||||
Period 5
|
||||||
Period 6
|
||||||
Period 7
|
* Rising
Star
** Shining
Star
*** Shooting
Star
Students can earn between 1 and 3 STARS for each of the 3
goals in the chart. So on any given day a student can earn up to 90 stars, but
no less than 30. No matter their behavior, they will always earn 1 star just
for showing up to school.
The key here is to make sure I use the correct language when
addressing these goals. Students do not “lose” stars. They only “earn” stars.
So I might say to a student, “Make good behavior choice so you can earn all 90
stars today.” OR “Are you working on earning stars right now?” OR “Is this
behavior going to help you earn stars?
This language is IMPERATIVE if this system is going to work.
They need to understand that they cannot lose stars. This is an extremely
important teaching tool. Once a student earns something, under no circumstances
should it be taken away. An adult can never understand the feeling a child has
when watching himself being stripped of all he worked to earn.
To draw a comparison – imagine you are building a house. You
work really hard for weeks. Then one day you make a mistake during building,
like putting a window in crookedly. Would your boss then come and tear the
whole house down? No, he would just ask you to fix that window. It has to be
the same for students.
Check back for a more comprehensive chart in downloadable
PDF format soon!
Thursday, September 13, 2012
A Day in the Life of an Inner City Teacher
When I first started teaching, I pictured myself driving
into the suburbs through greenery and past parks, tennis courts and well kept
houses with white picket fences. I imagined I would walk into the school and
see smiling faces, ready to give me a big hello and welcome. I imagined I would
have a moderately sized class, around 20 or 22, half boys, half girls whose
work would give me the perfect bell curve.
I was wrong. Instead, my life in education is vastly
different than I ever could have imagined. Growing up, I heard that the greater
the work, the bigger the reward. God, I hope that is right.
I initially chose teaching because I believed it would be a
great fit with my life as a mother of two beautiful boys. I could work a 7-8
hour day, including travel time and be home in time to make a healthy and
delicious dinner. I might even be able to pick my kids up from school.
My day begins at 8:30pm the night before. I take my shower,
lay out clothes (both for myself and my kids), I pack lunches (for myself and
for my 4 year old who is in preschool) and pack backpacks (also both for myself
and my 4 year old.) I also take some meat out of the freezer to make for dinner
the following night.
I am in bed by 9 and asleep by 10 (assuming my kids are
asleep. If one is sick or having trouble sleeping, I am up too). You might be
wondering why I am doing this all on my own. My wonderful, amazing partner in
crime, my husband Wesley, works night for TSA at Logan Airport. He is the
ultimate dad – works nights, goes to school and takes care of our two boys
while I work. Oh and he also runs a photography company as a side job. More later on
how little I see my husband and how we make that work!
When my alarm clock goes off at 4:30, I try very hard not to
wake Wes who only came home from work 4 hours prior to that. I also try very
hard not to wake the kids who share a room right next to mine. I quickly wash
up, dress and am downstairs and out the door by 5.
I walk swiftly to the train station (only a few hundred
yards from my house). I always have just enough time to buy a coffee and wait for the 5:13 am train.
I arrive in the inner city, just outside of Boston, by 6:05am. The inner city where I work is less than 2 square miles and has a major poverty epidemic. I step
off the train and am hit in the face with a wall of stink—trash. The train
station here smells like trash. I walk past some freshly painted graffiti from the
night before which only covers old graffiti. It is still dark, so I walk very
quickly to the school, which is very close to the train station. I walk under
the highway overpass on my way.
I am in my classroom by 6:15, one hour and 10 minutes before
the students arrive. This is how I like to do my prep work. The building is
quiet (except for the security guards doing their rounds and the principal and
vice principal in their offices, custodians, plus a few teachers). I whip around the room
planning for the day.
Promptly at 7:25 the early bell rings and a barrage of
students clamber up the stairs from the cafeteria where many of them have just
had breakfast. I watch as my students enter the classroom, one by one. I very rarely get a smile from them this early in the day. Until
all 3 are in the room. Yup, 3. I teach
an alternative middle school program. I teach students who haven’t been successful in the
mainstream classroom and need alternative teaching methods, one on one and
sometimes, a probation officer.
The blocks we teach are 63 minutes long and the students are
with my assistant and me most of the day. At some point, I have a team meeting
while the students are with another teacher. The meeting is comprised of
myself, two other teachers, two paraprofessionals, a social worker, an
outreach coordinator and the director of our program who is also a social
worker (clinician). The members of the team have fewer teachers than social
workers … even the two paras are social work students (BTW they are amazing).
At 11:30, I go to lunch – I get 25 minutes. I usually eat in
my classroom to allow me some quiet time to decompress. Some view this as
anti-social and that it makes me unapproachable. But I feel I would be very
difficult for my team and students to be around if I didn’t have that time to
myself.
During my lunch, I call home and talk to my husband and 4
year old, and now my family members have started putting the phone up to the
ear of my 11-month old so he can hear my voice. Not being home when they
wake up is a huge adjustment. This is the first job I have had where I leave
before the kids get up.
The students are dismissed at 3:36pm. I quickly clean up,
shut down my computer and rush to make it to Dunkin Donuts before my 4:12 train
home. I make it home around 5:15, and immediately get in my car and go pick up
my kids. If I am lucky, my mom invites us to stay for dinner. If not, I pick
them up, go home by 5:45 and get dinner together (FYI: The crockpot has become
my best friend!!)
After dinner, I dump plates in the sink and take my two boys
up for a bath. This is my favorite time of day. They LOVE having a tubby! We
splash, play, color on the walls, and scrub the long day off. Then it’s
pajamas, playtime for 30 minutes and bed for my munchkins.
Then comes the rounds of “mommy, I need some water” or
“mommy, will you lay with me?” or “mommy, are you going to leave without me?”
My poor 4 year old has been having anxiety at bedtime, knowing when he wakes in
the morning I won’t be there. I believe he will adjust and having his dad home
every morning has been helpful for the transition.
Once the kids are settled and hopefully asleep, I start all
over again!! It’s a long, tiring day, but I believe the rewards that will come
throughout the year will be worth it...at least, I hope!
Sunday, July 22, 2012
Interview Tips
I am currently looking for a new teaching job since the last job I had was a temporary position and ended in June. Interviewing for positions is great experience, but it can be stressful and nerve wracking too! Here are some tips for taking control of your interview and showing the team (or the principal) that you are an excellent choice:
1. Do your homework. Find out as much about the school or district as you can before your interview. This will enable you to ask thoughtful questions. It's always a good idea to mention something positive that you learned about the school in your research. This shows the team that you are interested in their school, beyond just earning a paycheck.
2. Dress professionally. Men should wear a shirt and tie with dress pants. Women should wear pants or a skirt (Should be at least to the knee), with a tailored top that is not low cut or too tight. Choosing the right attire is important because it shows the interview team that you take them and yourself seriously and you're ready to act like a professional.
3. Allow lots of travel time. If you have never been to the area where your interview is being held, allow at least one extra hour of travel time. You may get lost or stuck in traffic and being late for an interview will most likely blow your chances at the job.
4. Arrive no more or less than fifteen minutes prior to the start of your interview. The team will feel rushed if they know you are sitting out in the lobby waiting. But those fifteen minutes will give you an opportunity to visit the restroom to check your appearance, double check that you are in the correct part of the building (some of these schools are so large it's hard to know where you need to be), then find a seat and take a few deep breaths to calm yourself before going in to meet your potential future employers.
5. BE YOURSELF! The committee wants to know who they are getting. As long as you're being yourself, there's no reason to be nervous because, as Dr. Seuss famously said: "Today you are you, that is truer than true, there is no one alive who is youer than you!" Being yourself will make you feel more confident as well.
6. Make eye contact. When you are speaking, scan the room and make eye contact with everyone at least once while speaking, but spend most of the time on the person who asked the question.
7. At the end, it is common for the interviewer to ask if you have any questions. Have at least 2, but no more than 4 questions prepared. Some good ones are: what literacy program do you use? what math program do you use? what is your school day? will I have responsibilities outside of the school day, for example, after school programs? I saw on your school's website that you offer _____, how do you think I can help with that?
8. When the interview is over, no matter how you think it went, give a confident handshake and a smile. Leave a good impression.
Some Faux-Pas that will potentially ruin your chances:
1. Chewing gum
2. Bringing in a coffee. If you need a bottle of water, keep it in your bag, out of sight, and drink it only when the interview is over.
3. Lying.
4. Looking down at your hands or at the clock.
5. Being late.
6. Interrupting.
7. Your cell phone ringing (leave it in the car!)
8. Dressing sexily or sloppy
Good luck and leave comments if you think I missed any big ones!
Wednesday, June 20, 2012
Differentiated Instruction Part 1 - Spelling
Hey Everyone! It has been a few months since I have written, life has been so busy!
I was thinking this morning about some ways that you can differentiate instruction in your classroom. There are some very simple things you can do weekly that don't cause too much stress and time on your part. Most of the work can be done ahead of time.
Do you work in a district where the curriculum contains 10-20 spelling words, where you give the list on Monday (generally with a pre-test), work with them all week and test on Friday? If you do, then you are among the majority. Personally, I don't believe that is the best way to learn new words, but it is a good way to work on phonics methods. (Please make sure you also have a Word Wall!)
If you work in a general edu classroom, then you probably have several kids who get them all right during the pre-test on Monday. If you're like me, you can't see the benefit to these kids working with these words all week when they already know them all! So have another list. List A (the curriculum given words), List B (the next grade's words, using the same phonics rule) and List C (challenging words-much higher level, still keeping same phonics rule).
Here's how I do it:
Monday - pre-test everyone with list A then correct the words on the spot. Those who get them all right (I allow one wrong), then go on to a pre-test for List B. If they get them all right, they get handed List C - no pre-test.
Tuesday - Each student puts their own list words into ABC order.
Wednesday - A sentence using each word. This will be a challenge for kids who are on List C, as they may have never heard some of the words. Keep children's dictionaries on hand and be prepared to conference with them.
Thursday - Write the words three times each or unscramble the words. We also do a spelling bee on Thursdays, using current words and past words - good way to bring back past lists! BTW Kids LOVE spelling bees!
Friday - Test ... one at a time. First A, then B, then C.
A few notes:
1. Make sure the lists "look" the same. Parents get upset about stuff like this. Most will be fine with different lists for kids, but they won't be okay if they "look" different. Use the same paper or notebooks for each list.
2. Spelling notebooks are a great way to keep all of their weekly spelling work together. After the pre-test, their new list can be stapled or glued in to the notebook.
3. Make sure you have the weekly words posted somewhere in the room every week.
4. If kids get upset that they don't "make it past list A" just remind them that List A is where they should be and they just need to keep working hard. This will give them something to strive for and will give higher level students one more opportunity to work with higher level words.
Good luck differentiating!!! Look back for more ideas :-)
~Lisa
Friday, April 27, 2012
Parents
Dealing with your students' parents is a very important part of the job. Cultivating positive connections to home is very important and will help the student feel more at ease in the classroom. Unfortunately, there will be times when you do something or say something a parent doesn't like. In my experience, parents are not shy to come forward when they are not happy. Here are a few guidelines I have for addressing parents' concerns:
1. Do not be caught off guard. If they have a concern, please ask them (politely) to make an appointment to discuss it - by phone or in person.
2. E-mail can be helpful to solve a quick problem or answer a question. But use it sparingly. When the problem becomes bigger or is too involved, go face to face or voice to voice.
3. Don't answer calls from parents on home or cell phones. You have a private life that extends beyond the school. When you leave at the end of the day, parents need to respect that. If you answer, not recognizing the number, politely ask the parent to call you at the school in the morning. If it's a true emergency, then it may be important to deal with it.
4. Stay positive. Parents want reassurances that you care about their child and want what's best for him/her.
5. Don't get defensive, it's an admission of guilt. Parents can be very critical. Try to stay calm and keep your voice steady. If he/she gets belligerent, call in the principal to help. That's what he/she is there for.
6. Keep the conversation focused. Try to keep the conversation on track and focused on what the teacher and parent can do together to help the student succeed. Try not to rehash repeatedly what made him/her unhappy to begin with.
7. Remember, YOU are the professional. You were hired to do a job. Stay professional by not arguing or making passive-aggressive comments.
Sunday, April 1, 2012
Starting My New Job!
Hi Friends! I am so excited about starting my new job in 2 days. I will be teaching first grade for Wilmington Public Schools as a long-term substitute teacher. This will be the first time I leave my son, Joseph who is 6 months old. I am excited, but also a little sad to leave him. This mommy guilt is killing me!
Tuesday, January 24, 2012
Tuesday Tip: Sharing Ideas with Fellow Teachers
I have had many, many opportunities to share ideas with colleagues. Some of my ideas have been appreciated and other haven't. There will be so many times in your career as a teacher to sit in roundtable discussions and share your ideas and philosophies. It is important to remember to listen as much as you talk, especially if you are a younger teacher.
Veteran teachers have lots of very important experience to share, but that doesn't mean their way is the only way to do things. In order to cultivate mutually respectful relationships with your fellow teachers, listen to others' ideas, share your ideas and respect whatever decision is ultimately made, regardless of your personal opinions.
I will be totally honest with you, however, it's hard! I have had a very difficult time with it, especially being the extremely opinionated person that I am! But since starting my teaching career, I have learned the importance of cultivating relationships with fellow teachers. And it all begins with listening. It took me some time to learn that, so I hope you can benefit from the wisdom of my experience.
Monday, January 23, 2012
Management Monday: Beginning the Year
The first 6 weeks of school are, in this teacher's opinion, the most important. This is when I set up the routines and classroom procedures that will guide us through the rest of the year. It is more important to be consistent now than any other time. You will thank yourself later for having come up with very specific ways of performing tasks and ensuring students learn these procedures. Let's start with the most simple one - entering school in the morning.
There is so much to be done first thing in the morning. I have a very important rule that MUST always be followed though - I ask parents not to come into the classroom first thing in the morning. This is a time of routine and quiet work and having even one parent stop in for a spontaneous conference is very distracting to the day's routines.
First, student must hang up their backpacks on their hooks outside of the classroom. For the first week of school, I stand in the doorway to remind students what they need to do in the hallway before crossing the threshold. I don't allow book bags in the classroom because they are big and awkward and are a major tripping hazard.
Before entering the classroom, students need to empty their things out of their backpacks and carry their items into the room. Immediately, they put their items away and get to work on their morning math and grammar.
It is important not to introduce too many new routines on the first day. Stick to the most basic and/or important on the first day of school. After a few days, introduce another few. Also, try very hard not to have too many intricate details within each routine. The basic parts are important to hit, you can always add more specific tasks in later.
 |
| Great book! This will give you some great management strategies for the beginning of school. Especially helpful for first-year teacher. |
Saturday, January 14, 2012
I Go By ...
One of the biggest organizational problems I have had is the chaos of the end of the day. In those last 15 minutes we try to squeeze in so much and I kept feeling like things were falling through the cracks. Then there was the inevitable - "oh Mrs. Fornero, I am taking the bus today!" "Oh ya, I am going on a playdate at G's house!" "My grandmother is picking me up, I have a dentist appointment!"
In order to ensure I knew ahead of time where everyone was going that afternoon, I made it their job and part of their morning routine to tell me. But let's face it - 22 kids telling you how they are getting home that afternoon? I might remember 2. So I created this "I Go By..." board.

I used sentence strips to write the different options, then put little pieces of velcro next to the option. Each of their names were put on a strip with velcro on the back and each morning they put their name next to their transportation method.
The options were - Bus, walk, car, playdate, or after-school program. Underneath the board (not shown) was a basket where students could drop notes to me from their parents. If a student was doing something out of their normal routine, we needed a note to allow it.
I hope this helps with some organization :-)
Thursday, January 12, 2012
Valentine's Day Craft and Writing Prompt
Boy is winter here!! January 12th and we finally got some very cold weather. Totally miserable day outside - rainy, windy, and cold! I am lucky to live on the ocean or we would be socked with snow. On the plus side, snow means a snow day!
So I am in my sweats, on my couch. My 3-month-old is content in his swing and my 3-year-old is playing Dragonland on his dad's Ipad. This is a very typical afternoon for me. And the perfect time for a blog post.
The writing prompt we did was a very common one - "what does love mean to me?" I encouraged the students to think of times when they feel the most loved and the most special people in their lives. I was very proud of what they came up with.
To make it pretty, they did their final drafts inside of a heart on white paper. I then gave them pink, purple, red and white tissue paper. Their challenge was to decorate their paper with little, scrunched up pieces of the tissue paper and glue them down in a unique design on their writing samples. The purpose of the challenge was to strengthen their "alligator fingers." These are the muscles in the fingers they use to write. This is especially helpful for students who have poor penmanship. Since we still teach penmanship in our school, I felt it was important to do exercises such as this to work on forming letters and gaining more control of their pencils - a problem for many students.
I think the finished product came out really cool!

Wednesday, January 11, 2012
President's Day Lesson
As part of our President's Day unit, the 3rd graders in my class last year learned how to retrieve information from two articles, one about Abraham Lincoln and one about George Washington (I got the articles off www.abcteach.com). We used yellow highlighters to highlight important information, pink to highlight unfamiliar words, and green to highlight text to self connections.
Once finished reading and highlighting the articles, I passed out Venn Diagrams to the students. I did a mini lesson on how to use Venn Diagrams to compare and contrast two items. We then placed information from the articles onto the Venn Diagram to compare and contrast two Presidents.


Once finished reading and highlighting the articles, I passed out Venn Diagrams to the students. I did a mini lesson on how to use Venn Diagrams to compare and contrast two items. We then placed information from the articles onto the Venn Diagram to compare and contrast two Presidents.


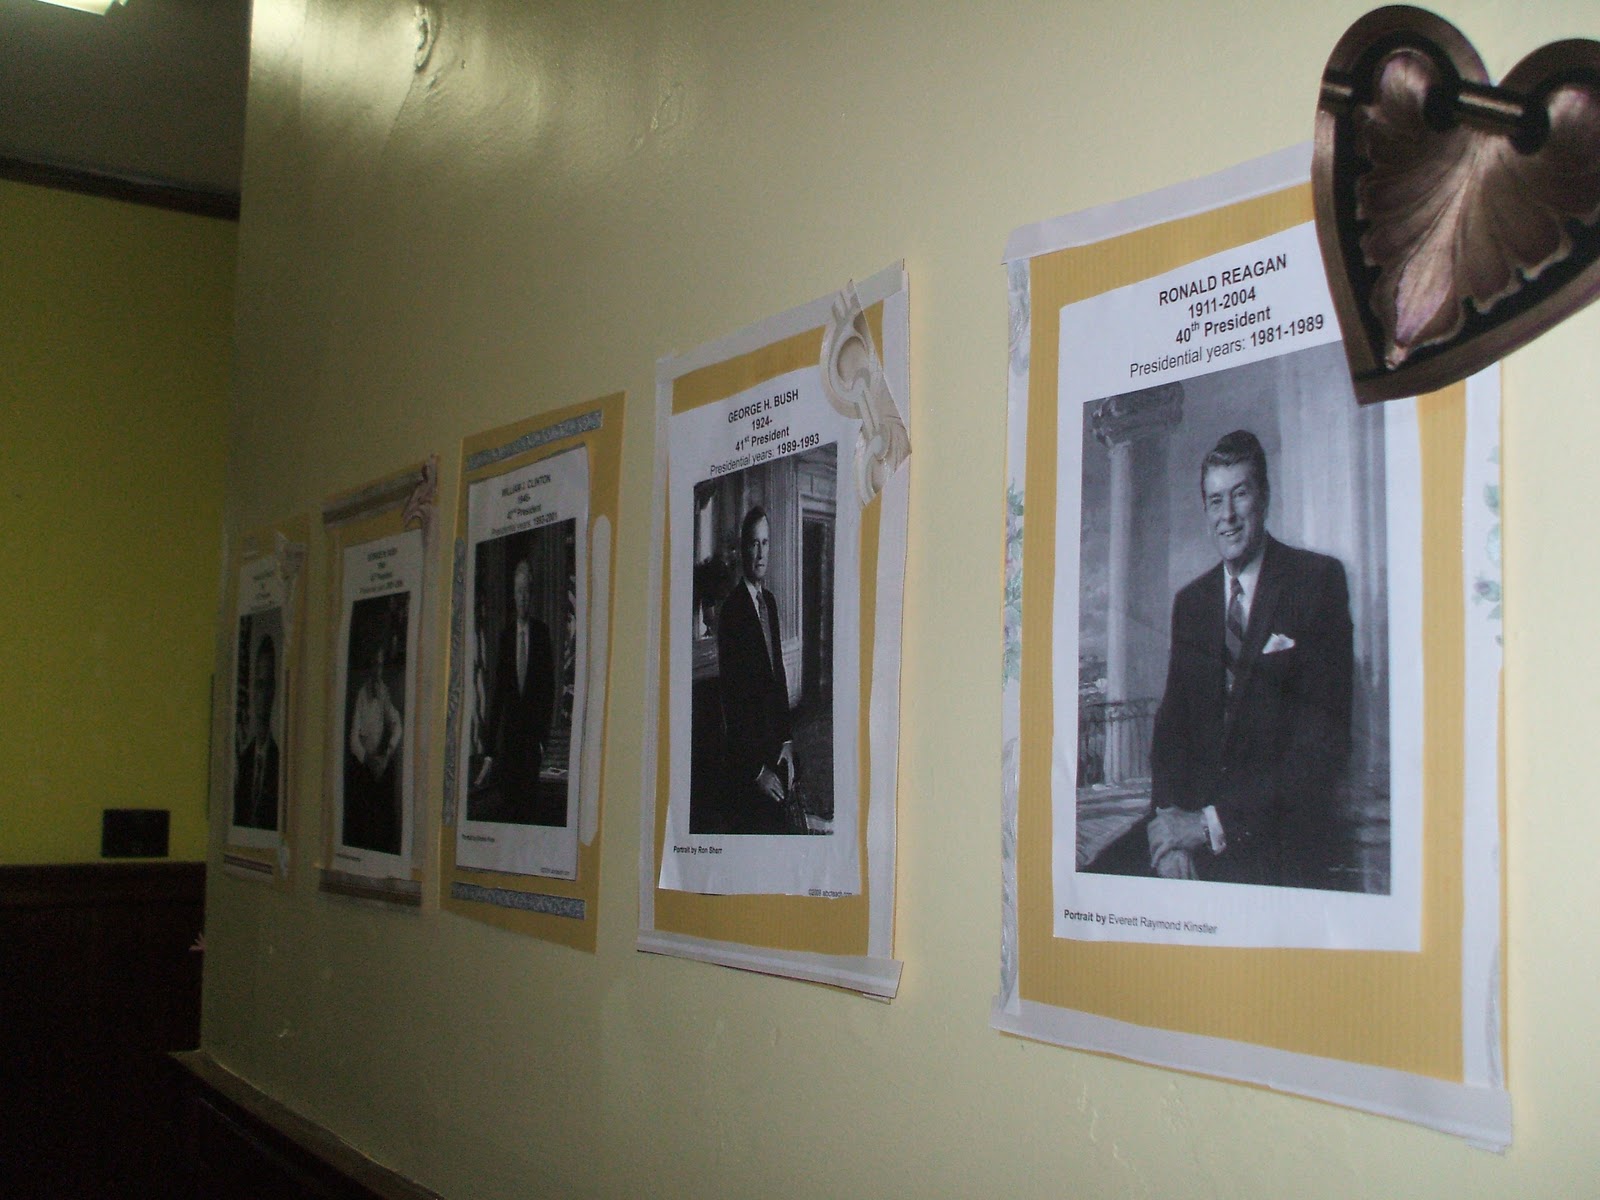
Hall of Presidents
I did this great craft last year for Presidents Day. I printed out 8x10 photos of each of the 44 Presidents from www.abcteach.com and we made "presidential-looking" frames to go with each one. We used remnants of wallpaper samples to create a surround and glued the photos onto the background. We had some great discussions about each President as the students created the frames. We then taped the framed photos up onto the wall in the hallway outside my classroom and named it the "Hall of Presidents."


Monday, January 9, 2012
Soil "Trifle"
I am constantly trying to come up with ways to make lessons more memorable to students. This is one that students from 3 years ago still talk about. In fact, the day I did this lesson, I had an eighth grade student visiting in my room and he still asks about it too!
This lesson was to teach about the different types of soil - sandy soil, loam soil and clay soil. We then made edible "soil layers trifle." Which, of course, they got to eat when done (the best part!) Just be aware of any allergies your students may have. Some have uncommon allergies that you might not think of - it's not just peanuts anymore!
The ingredients I used:
loam soil - crumbled chocolate cake - you can also use crushed chocolate cookies)
sandy soil - crushed Nilla wafers (or graham crackers)
clay soil - crumbled red velvet cake
silt - marshmallows (or whipped cream)
animal fossil - gummy worm
plant fossil - mint leaf

 |
| The students were given their materials in plastic bags, already portioned out and labeled, a plastic spoon for "digging", a clear plastic cup, and an observation sheet. I gave them enough to do 2 trifles - so they could eat one on the spot and take one home to show their parents (and eat after dinner!) |
There are also many ways to do this lesson with non-edible items. If your school has rules about using food items for lessons, find materials that are non-edible, but try to keep the colors as close as possible to try to represent the real thing. Here are some suggestions:
loam soil - dirt
sandy soil - sand
clay soil - red/maroon crayons (crushed - easy to do with a sharp knife)
silt - salt
animal fossil - plastic animal figure (easy to find at the Dollar Store)
plant fossil - plastic plant (also easy to find at the Dollar Store - look for packs of little dinosaurs, they have the animals and plants in the same pack)
When we finish science lessons - I always pass out a "self-assessment form." This is an opportunity for students to grade themselves. They are given a rubric with points from 0-4. I find that the students are always harder on themselves than I would ever be on them!
The scale:
0 = no attempt was made
1 = I didn't really try very hard and I need to work harder on this next time
2 = I tried, but I had a hard time and will keep trying
3 = I tried and got most of the work done right
4 - I worked hard and followed all directions
1. Did I follow all directions as given?
2. Did I work well with my partner? Did I give him/her a chance to speak and did I listen to him/her?
3. Did I pay attention and stay on task?
4. Did my product turn out the way I wanted it to?
Sunday, January 8, 2012
Painting Like Michelangelo
This was a really fun lesson, the kids had a blast. We began by reading a short biography on famous artist Michelangelo. We talked about and saw copies of his famous paintings. Then we talked about the ceiling of the Sistene Chapel and what it must have been like to lay on his back and paint for hours and hours, day after day, for two years.
After discussion, the kids got to try it out! I wish I could show you the photos I took of the students with drops of paint all over their faces!
 |
| Getting to Know the World's Greatest Artists: Michelangelo |
After discussion, the kids got to try it out! I wish I could show you the photos I took of the students with drops of paint all over their faces!
 |
| Painting the Sistene Chapel! |
 |
| How did your arm feel after 10 minutes? 20 minutes? |
Classroom Management
Hey Everyone - Happy Monday!
So I hate Mondays. HATE Mondays. I have the hardest time getting out of bed on a Monday morning, no matter what time I go to bed on Sunday night. I feel like I need to get one more thing in. Last night, for example, I put my two cherubs to bed and got to work labeling all the bins in the toy closet. Some scrapbook paper, self-adhesive letters, some modge podge and voila! A very organized toy closet. Photos to come!
I thought I would also squeeze in a blog post about my classroom management system. I got the idea from a professor in my Master's program at American International College. He is also a 4th grade teacher and uses these as a positive reinforcement tool. I use them a bit differently and they can be adapted to any classroom. I call these bills "Fornero Dinero." Whenever I catch a student doing something right - sitting or reading quietly, getting ready, working efficiently, lining up quietly, etc. I simply slip one in their hand. I don't draw attention to it - but it certainly garners attention. It catches on so quickly!
One time, the students were lining up to go to Music and they were very loud in line. I looked around for one student standing quietly and patiently. I spotted her and handed her a Fornero Dinero. As soon as I did - like a ripple effect, each student began quieting down. I never had to raise my voice or even speak. And without words, they all got in a straight, quiet line and we headed to Music.
How Does It Work?
Once a week we do a "drawing." I usually do it on Friday afternoons, right before Fun Friday (choice) time. As students collect Fornero Dinero throughout the week, they write their names on the back. On Fridays, I collect them back and put them all in a bin and draw one or two and the winner gets a prize.
My prizes are: a homework pass, choose an item from the "treasure chest," lunch with the teacher, or teacher for a day (student teaches a lesson).
I also use this opportunity to teach about probability - reminding them that the more Fornero Dinero they put into the drawing, their chances of winning are much better. Before each drawing, I randomly pick a student and ask how many bills he or she entered into the drawing, then I tell the class how many are in the bin then ask what is the probability of this student winning?
Then we put it up on the board - 8 out of 40 = 1/5 or 20% chance of winning. I do this for each student and find out who has the best chance of winning.
I got the idea from the professor I mentioned before - his last name was Bateman so he called the bills "Bateman Bucks." Find a name for money that rhymes or has alliteration with your name and it makes it more fun!
 |
| Not legal tender! |
Tuesday, January 3, 2012
Repurposing Shaving Cream
This is a really fun way to practice cursive letters, printing letters, multiplication facts, etc. It can be used as a whole class activity or as a literacy center. We had so much fun with this lesson.
While the students were out of the room, I sprayed shaving cream all over each of their desks. When they came back in, we did one cursive letter of the alphabet at a time, starting with A. The shaving cream allowed their little hands to move fluidly on their desks, as needed to create cursive letters.
As a bonus .... the desks had never been cleaner!!


Teaching About Warm and Cool Colors
Sadly, the art teacher from the school I work at passed away last year from cancer. She was an amazing woman and wonderful art teacher. While she was sick, the classroom teachers in our school agreed to take on teaching art so that she could continue to receive her pay through the end of the school year.
During that time, I spent countless hours in the library researching art lessons for 3rd graders. Here's one I came up with to teach about warm and cool colors. I used Shamrocks because it was March and thought it was a good way to tie in a St. Patrick's Day craft.
All you need is a shamrock tracer, white or manila card stock and markers.
I traced the shamrocks onto the card stock for my students, but they cut them out themselves. They began by tracing their hands and forearms across the side of the shamrock. Then they alternated colors in a pattern using warm colors (reds, yellows, oranges) for their hands. Run one color all the way around the hand in a single line. After filling in the hand, they used cool colors (blue, purple, green) to fill in around the hand. I suggest having the students begin their lines around the hands first.
For younger students - do the two pieces separately and glue the hand onto the shamrock.


Monday, January 2, 2012
New Name!
Confident Little Readers is now Confident Little LEARNERS. That way I can post about all things teaching!
Teaching Symmetry
One of the lessons in math I teach each year is on symmetry. It's a very basic concept, but I like to have some fun with it so I come up with an art project for the students to do to illustrate symmetry. Below is a fun one we did last year.
Materials:
A photo of each student - student must be facing the camera as straight as possible, smiling, printed in black and white
White card stock
glue stick
pencil
Start by cutting each photo down the center of the student's face. Make sure it is exactly half. Hand each student half of their face (they will think this is hilarious). Ask them to glue the half-picture onto the card stock, as far to the edge as possible.
Using a pencil only, students should draw the other half of their face on the blank side of the page, using as much symmetry as possible.

My Classroom
As you may remember from my previous posts, I am taking a year off from teaching because I had a baby (3-month-old Joseph) in October. He joins my little family of my amazing husband Wesley and my spirited 3-year-old son Frankie.
Taking the 2011-12 school year off has taught me one important thing so far: I LOVE BEING A TEACHER! I just can't wait to get back to teaching in September. I have so many fresh and creative ideas for classroom design and lesson plans, as well as interactive bulletin board displays. I simply can't wait to try them out.
I wanted to post some photos of my 3rd grade classroom at my school in Gloucester, MA. Here you can get an idea of what my style of teaching is. My goal for this September is to take wider photos of the entire classroom so you can see the desk and bulletin board set up.
 |
| The community supplies are in a central location and clearly labeled. These bins were purchased at Dollar Tree, they came in lots of colors. However, I am toying with the idea of having supplies for each table group instead of the whole class. This may make transitions easier and quicker. |
 |
| Calendar and birthday wall. |
 |
| We keep track of how many days in school with this place-value pocket chart. |
 |
| Interactive "Celebrate America" Social Studies board. I put three books into pockets and wrote questions below . I left space on the right for student to post their answers. |
 |
| In third grade Science, we chart weather patterns, so we keep track of the daily weather. In addition, I used the language of Science - "observation" and "prediction" to remind students that they are indeed scientists! |
 |
| Book baskets (from Dollar Tree). After testing each student, I determined their reading levels and used those levels to make book recommendations which I weekly put in their book baskets. During Reader's Workshop, students needed to use a book from their book baskets. Each label has the student's name and the level books they are allowed to choose from. |
 |
| Reading corner: I like to put books on display that correspond with a particular theme, season or unit. Below, books are sorted according to level. |

 |
| More classroom supplies and math manipulatives. Each bin is clearly labeled. The milk crates have clip boards, white board and blocks. I don't like the look of this so it will be more organized next time you see it. |
Subscribe to:
Posts (Atom)